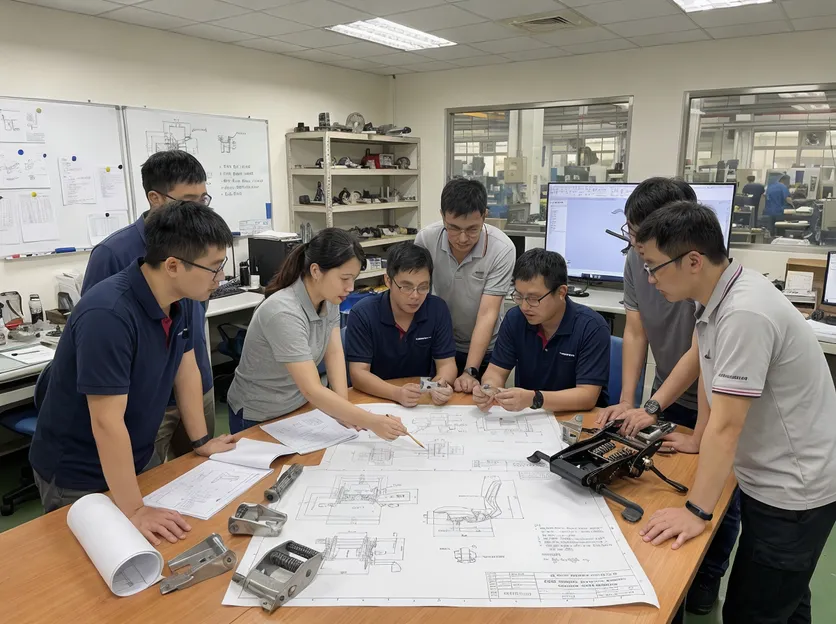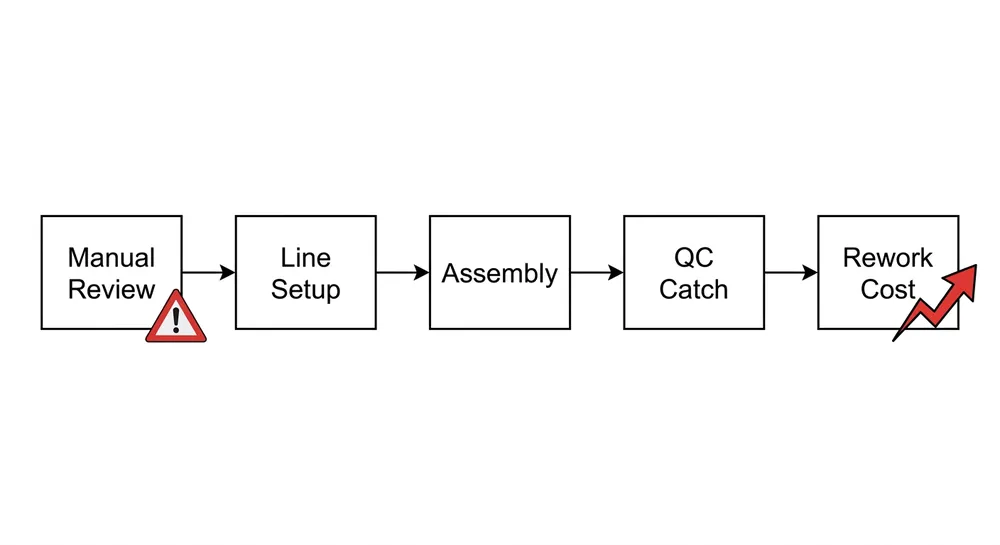
A misread torque spec on a tilt mechanism costs you one unit. A misread torque spec running across a 2,000-unit assembly batch costs you a container return, a rework line, and a supplier dispute that takes three weeks to resolve. The manual is where that error either gets caught or gets baked in.
Most assembly errors at scale don't start on the production floor. They start when someone approves a supplier's documentation without checking whether it actually matches the hardware being shipped. The manual arrives as a PDF, it looks complete, and nobody reads it carefully until something goes wrong.
This guide is for the people who need to read it carefully before production starts.

Where assembly errors actually originate: the manual gap problem
The standard explanation for assembly errors is operator error. That's usually the wrong diagnosis.
When we talk to buyers who've had rework issues with chair mechanisms, the pattern is consistent: the assembly team followed the manual they were given. The problem was that the manual was incomplete, translated loosely from Chinese, or written for a slightly different hardware revision than what shipped.
Three manual gaps cause the majority of scale assembly failures:
Missing or vague torque specifications. A manual that says "tighten securely" instead of "35–40 N·m on the central pivot bolt" gives your line workers nothing to calibrate against. On a 500-unit run, variation in bolt torque produces inconsistent tilt resistance across the batch. Some units feel stiff, some feel loose, and none of them are wrong by the manual's standard because the manual never set one.
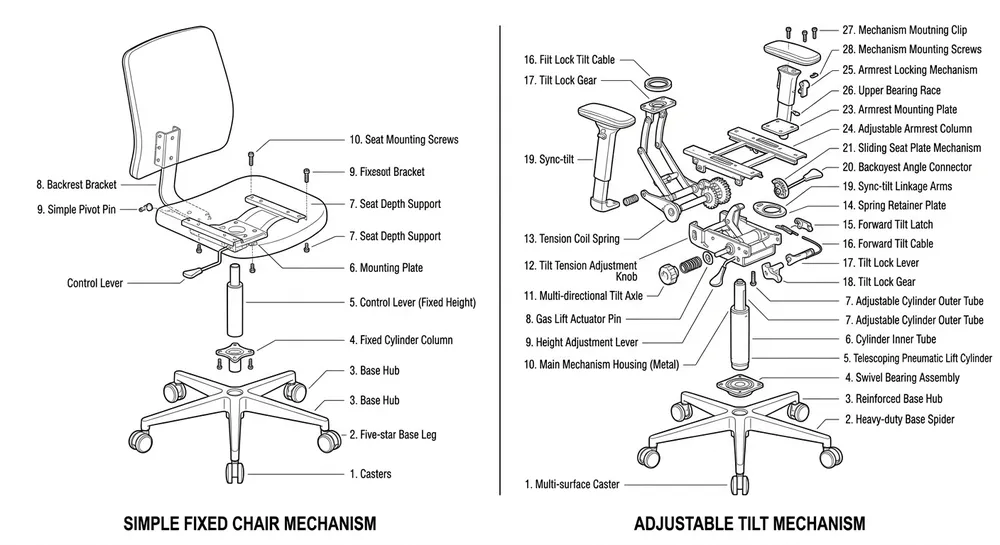
No mounting dimension callouts. Chair mechanisms attach to seat plates via specific bolt patterns — typically 4-hole or 6-hole configurations with center-to-center spacing that must match the seat plate tooling. If the manual doesn't specify the mounting hole pattern with dimensions (not just a diagram without measurements), your fabrication team is measuring off a sample unit. When the sample and the production batch have a 0.3mm variance in hole position — which is within normal stamping variation if tolerances aren't held tight — you get misalignment that shows up as binding or uneven tilt.
Cycle rating and load spec absent. A manual that doesn't state the mechanism's rated load capacity and tested cycle life gives you no basis for incoming QC. You can't verify what you can't measure against a stated spec.
These aren't edge cases. They're the standard output of trading-company suppliers who relay documentation from the actual manufacturer without production accountability. The manual they send you was written by someone who doesn't control the tooling that made the part.
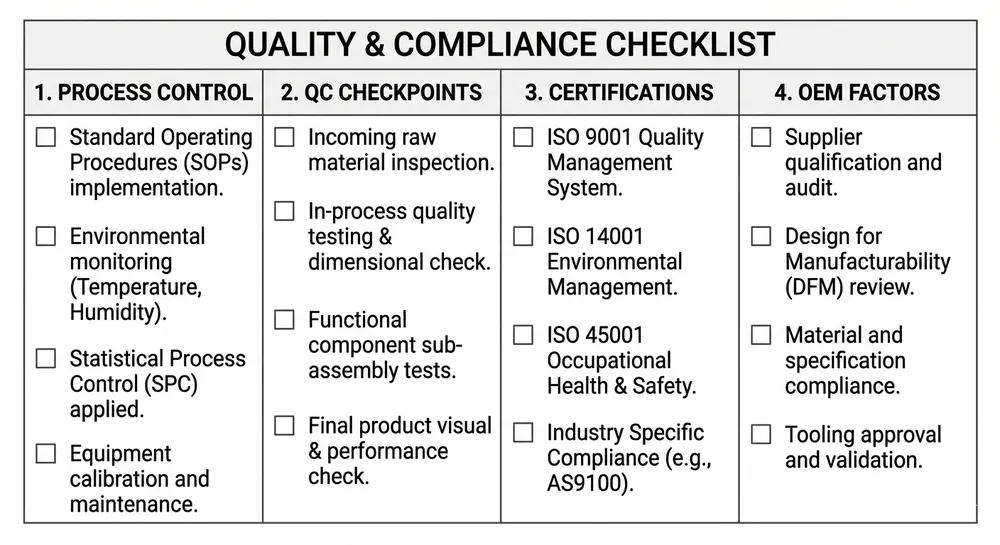
What a complete chair mechanism manual must contain
Before you approve a supplier's documentation package, check it against this list. A manual missing any of these items is incomplete for production use.
Dimensional specifications:
- Mounting hole pattern with center-to-center dimensions (mm)
- Overall mechanism footprint (length × width × height)
- Seat plate interface dimensions
- Tilt pivot height from mounting surface
Mechanical specifications:
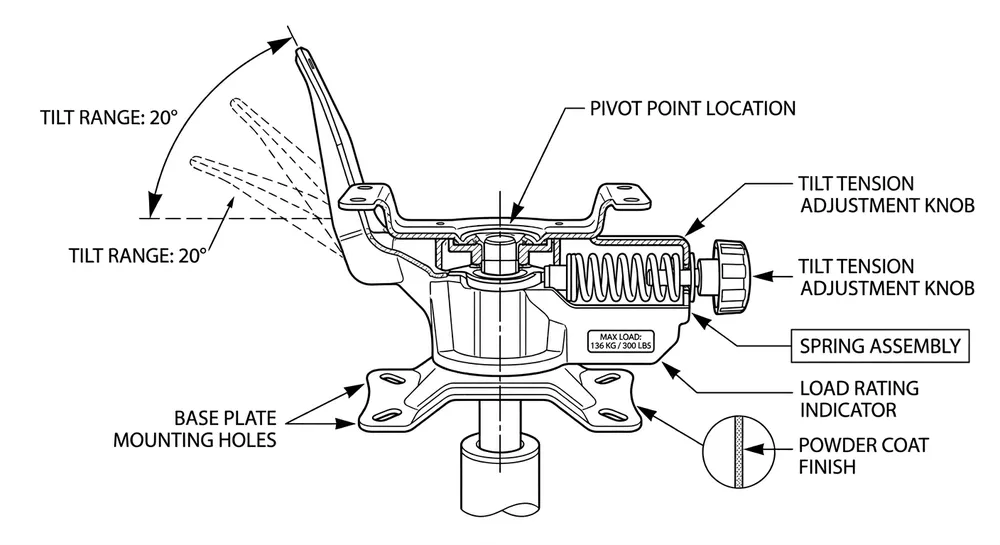
- Central pivot bolt torque range (N·m)
- Tilt lock engagement torque
- Spring tension range for tilt resistance adjustment
- Rated static load capacity (kg)
- Rated dynamic load capacity (kg)
Performance ratings:
- Cycle life rating (minimum 50,000 cycles for commercial office use)
- Tilt angle range (degrees, both forward and back)
- Lock positions and engagement method
Assembly sequence:
- Numbered steps with hardware callouts (bolt size, washer type, quantity)
- Torque sequence — which fasteners to tighten first and in what order
- Orientation markers for asymmetric components
Surface treatment and material notes:
- Coating type on load-bearing surfaces
- Any lubrication requirements at pivot points
- Corrosion protection spec for the target market (salt spray hours if applicable)
If the manual you received covers dimensions and assembly steps but omits torque specs and cycle ratings, you have half a document. You can assemble from it, but you can't validate from it.

Step-by-step: using the manual to set up a new mechanism SKU on the line
This is the sequence we recommend to buyers setting up assembly for a new chair mechanism SKU for the first time. It applies whether you're running 500 units or 5,000.
Step 1: Cross-reference the manual against the physical sample before line setup.
Pull the sample unit and verify every dimension in the manual against the actual hardware. Check mounting hole spacing with calipers, not a ruler. Verify the tilt pivot height. Confirm the bolt sizes match what's called out. If anything doesn't match, stop here and go back to the supplier before you set up the line.
(We've seen buyers skip this step because the sample "looked right." The sample looked right because it was made to the old tooling revision. The production batch was made to a revised die, and the mounting hole spacing shifted 0.5mm. That's enough to cause binding on some seat plate configurations.)
Step 2: Extract the torque specs and post them at the assembly station.
Don't rely on workers reading the full manual during production. Pull the critical torque values — central pivot bolt, tilt lock fasteners, mounting bolts — and post them as a one-page reference at the station. Include the tightening sequence if the manual specifies one.
Step 3: Set up a first-article inspection before the full run starts.
Assemble 3–5 units, then pull them for full dimensional and functional check against the manual specs. Verify:
- Mounting hole position matches spec (±0.15mm is a reasonable tolerance for stamped steel)
- Tilt range matches stated degrees
- Lock engages cleanly at each position
- No binding through the full tilt arc
If first-article passes, release the run. If it doesn't, identify whether the issue is in the assembly process or in the parts themselves.
Step 4: Set functional test criteria from the manual's performance specs.
Your end-of-line functional test should check against the manual's stated specs, not against "feels right." Minimum checks:
- Tilt lock engages and holds under 100kg static load
- Full tilt arc completes without binding
- Mounting bolts torqued to spec (use a torque wrench, not feel)
Step 5: Document any deviations from the manual during the run.
If your line workers find that a step in the manual doesn't match the hardware — a bolt size is wrong, a component orientation is ambiguous — log it. Don't improvise and move on. Deviations that aren't documented become the source of the next batch's errors.
How to spot manual deficiencies from trading-company suppliers
The manual quality problem is structural, not accidental. A trading company sources mechanisms from a factory, adds a logo to the documentation, and passes it to you. They didn't write the manual, they don't control the tooling, and when the hardware changes between batches, the manual often doesn't.
Red flags in supplier-provided manuals:
- No revision number or date. A manual without version control has no traceability. You can't tell if what you're reading matches the current production batch.
- Dimensions given as diagrams only, no numerical callouts. Diagrams without measurements require you to scale off the drawing — which introduces error and isn't production-usable.
- Torque specs given as "tight" or "secure." This is not a specification. It's an instruction for someone who already knows the answer.
- Cycle rating absent or stated as "durable" / "long-lasting." These are marketing terms. A production-ready manual states a number: 50,000 cycles, 80,000 cycles, tested to BIFMA X5.1 or equivalent.
- Assembly steps that don't match the hardware. If the manual shows a 4-bolt mounting pattern and the mechanism has a 6-bolt pattern, the manual was written for a different SKU and was never updated.
- No material or surface treatment spec. If you're selling into coastal markets or humid climates, you need to know the corrosion protection spec. "Chrome finish" is not a spec.
When you see these flags, the right move is to request a corrected manual before approving the supplier — not after the first production run reveals the gaps. See our notes on chair mechanism quality standards for the full spec framework to use when evaluating supplier documentation.

Aligning manual specs with incoming QC and functional testing
The manual is only useful if your QC process is built around it. A lot of incoming inspection at furniture assembly operations checks cosmetic condition and counts units. That's not enough for mechanism hardware.
Incoming QC for chair mechanisms should verify:
Dimensional conformance:
- Mounting hole pattern: measure center-to-center spacing on a sample pull (5–10 units per batch minimum). Acceptable variance is ±0.15mm for precision-stamped components. Variance beyond that indicates tooling drift or a supplier change in production process.
- Overall height: verify against the manual's stated dimension. Height variation affects seat height calibration on the finished chair.
Functional conformance:
- Tilt range: cycle through full arc on each sampled unit. Note any binding or uneven resistance.
- Lock engagement: engage and disengage the tilt lock 10 times per unit. It should engage cleanly and hold without creep under load.
- Mounting bolt thread condition: run a bolt through each mounting hole. Cross-threaded or undersized holes show up here before they show up on the assembly line.
Load verification (batch qualification):
- For new SKUs or new suppliers, pull 3 units for static load test at the mechanism's rated capacity. Hold for 60 seconds. No deformation, no lock slip.
- For ongoing supply, run load verification on the first batch of each new production run — not just the first order.
The spec numbers for all of these checks come from the manual. If the manual doesn't provide them, you're running QC without a standard, which means you're catching failures by feel rather than by measurement.
We hold our stamped mechanism components to ±0.15mm on critical dimensions — that's the tolerance that makes the manual's assembly steps reliable across batches. When a supplier can't hold that tolerance, the manual steps stop working because the parts stop fitting the way the manual assumes they will.
What to ask your supplier when the manual doesn't match the sample
This happens more often than it should. The sample passes your evaluation, you approve the supplier, and when the production batch arrives, something is different — a dimension is off, a component feels different, the tilt resistance is lighter than the sample.
The first question is whether the manual was updated between the sample and the production batch. Ask for the revision number on the manual that shipped with the production batch and compare it to the one you approved. If they're different, you need the delta.
If the manual revision is the same but the hardware changed, that's a more serious problem. It means the supplier changed their production process without updating documentation or notifying you. Ask specifically:
- Was there a tooling change between the sample and this batch? If yes, what changed and what are the new dimensions?
- Was there a material or surface treatment change? Request the updated material certification.
- What is the current production batch's cycle rating? Request the test report, not just a verbal confirmation.
A factory that controls its own tooling can answer these questions specifically and quickly. A trading company relaying information from a third-party manufacturer will take longer and may not be able to get you the test report at all.
(This is the practical difference between sourcing factory-direct and sourcing through a trading layer. When we change a die or adjust a process, we update the documentation the same day. There's no relay chain where information gets lost or delayed.)
For buyers evaluating new suppliers, the manual audit is one of the cleaner qualification signals available. A supplier who provides complete, revision-controlled documentation with numerical specs and test data is showing you something real about how they run their operation. A supplier who sends you a diagram with "assemble as shown" is showing you something real too.
If you're sourcing chair mechanisms and want to see what a complete documentation package looks like — manual, dimensional drawings, test reports, and compliance certificates — request a quote and we'll include the full technical package with the sample. You can audit the documentation before you commit to a production order.
FAQ
What cycle rating should a chair mechanism manual specify for commercial office use?
The minimum for commercial office chair certification in most markets is 50,000 cycles, tested under rated load. BIFMA X5.1 is the standard most North American buyers reference; EN 1335 covers European markets. A manual that doesn't state a cycle rating gives you no basis for incoming QC or warranty claims. For high-use environments — call centers, 24-hour operations, hospitality — specify 80,000 cycles minimum and ask for the test report, not just the stated rating.
How do I verify that a supplier's manual matches the actual production batch, not just the sample?
Request the revision number and date on the manual that ships with each production batch. Cross-reference the mounting hole dimensions and overall height against the manual's callouts using calipers on a 5–10 unit sample pull. If the numbers match the manual within ±0.15mm, the documentation is current. If they don't, ask for the updated drawing before the batch goes to your assembly line.
What's the difference between a chair mechanism manual from a factory versus a trading company?
A factory-direct manual is written by the people who control the tooling. It has revision numbers, numerical dimension callouts, N·m torque specs, and test data tied to the actual production process. A trading-company manual is often a repackaged version of the original factory document — sometimes translated, sometimes not updated after tooling changes. The practical risk is that when the hardware changes between batches, the trading company's manual may not reflect it. See our notes on chair mechanism types for how to evaluate mechanism specs across different configurations.
Can I request a custom manual format for OEM production?
Yes. For OEM orders, we produce documentation in your required format — including branded manuals, multilingual versions, and assembly guides formatted for your end-user packaging. The underlying spec data (torque values, dimensions, cycle ratings) stays the same; the presentation adapts to your requirements. This is part of the standard OEM package, not a separate service.